Before the first freeze, usually mid-October in Grand Junction: cut the power at the breaker, shut off and drain the water line, drain the pan, close the vent inside and put on a breathable cover. While it's being done, look at the roof around it. The duct opening, the stand, the pan and the water lines are where swamp cooler leaks start, and most of them show up inside your house first.
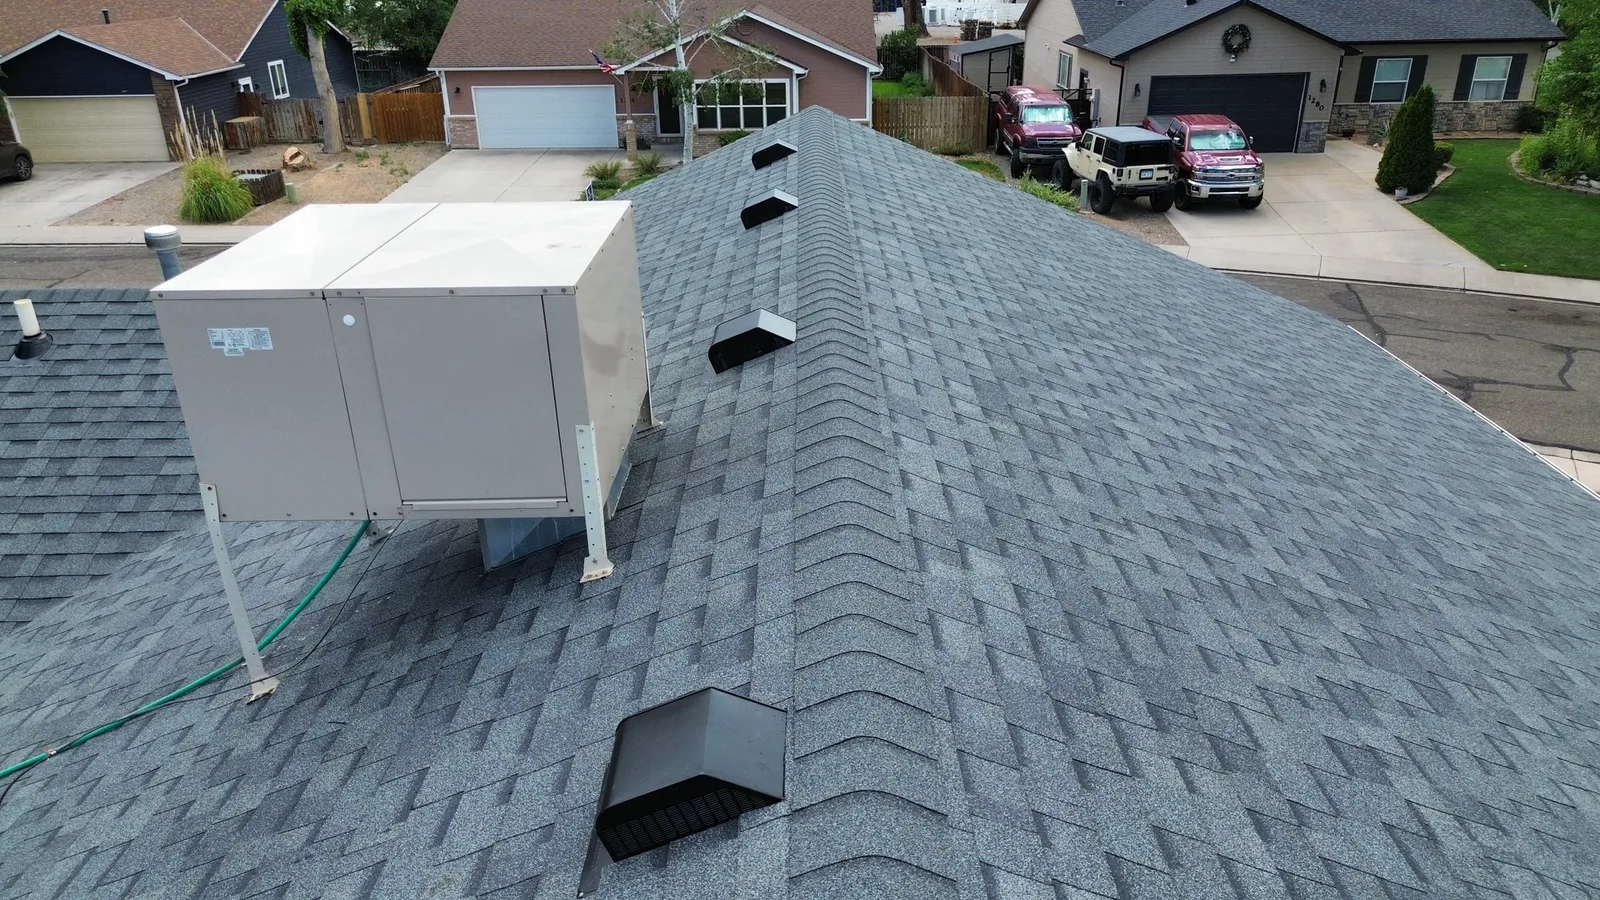
From May to September, the swamp cooler on your roof is the hardest-working machine on the house. Then the nights drop below freezing, and the same unit turns into three problems at once: a water line that can split, a pan that holds standing water, and an open duct that lets your furnace heat drift up and out through the ceiling.
Swamp coolers are a Western thing. Federal energy survey data shows about 7 percent of homes in Colorado, Utah, Wyoming, Idaho and Montana cool mainly with one, against under 1 percent nationwide, and the Grand Valley’s dry air is exactly the climate they’re built for. That also means a lot of Grand Junction roofs have one sitting on top.
Winterizing takes about an hour. And because someone is going up there anyway, fall is the best time to look at the part of the house most cooler owners never think about: the patch of roof the cooler sits on.
At the Grand Junction airport, the first freeze of fall (32 degrees) comes around October 16 in a typical year, according to NOAA’s 1991–2020 climate normals, and there’s about a one-in-ten chance it arrives by October 3. The first hard freeze (28 degrees) usually follows in late October. Where you live matters, too. National Weather Service figures for the area put the typical first freeze in Fruita, Delta and Montrose earlier than at the airport, and Palisade a bit later. The Colorado Climate Center has also found that the first fall freeze in Grand Junction and Palisade now comes more than a week earlier than it did in 1980.
So the rule of thumb is simple: once the forecast shows nights in the mid-30s, the cooler’s season is over. Don’t wait for the first hard freeze. On clear, calm nights, surfaces can run 3 to 4 degrees colder than the thermometer reading, according to the Weather Service, and a water line sitting on an exposed roof is exactly that kind of surface. A line that freezes full can split, and you won’t find out until it thaws and runs water where it shouldn’t, or until you turn the cooler back on in spring.
Here’s the order we’d follow. The first three steps happen from inside the house or at ground level. The rest happen on the roof.
If you’re not comfortable on a roof in October, steps 4 through 7 are exactly what an HVAC tech or cooler service does on a fall shutdown visit. Ladders and step stools sent about 273,000 people to U.S. emergency rooms in 2024, according to the Consumer Product Safety Commission. A frosty roof is a bad place to test your footing.
A rooftop cooler puts a heavy, wet machine on top of your roof and cuts a large hole through the roof deck for the duct. Even the U.S. Department of Energy points out that ground-mounted coolers are less likely to cause roof leaks than rooftop units, and that the regular maintenance trips can wear on the roof itself. Here’s where the leaks start.
The duct drops through a framed opening in the roof deck, usually on a raised curb. Building code requires that opening to be flashed, and the flashing around the curb is a seam, which is where water gets in. Sealant at the corners dries out and cracks in our high-altitude sun, which ages roofing faster here than almost anywhere (here’s why). And roofing tar smeared over a curb is not flashing. It dries, cracks and lets water in. On a flat or low-slope roof, industry standards call for flashing that runs at least 8 inches up the curb.
Many coolers sit on a steel stand with legs fastened to the roof. Every fastener is a hole through the roofing, and every leg is a point load. If the stand shifts, rusts or was set without proper sealing, water follows the fasteners into the deck.
A rusted pan doesn’t leak into the cooler. It leaks onto your roof, a little at a time, all summer. On a pitched roof that steady wetting wears and stains the shingles. On a low-slope section, the water has nowhere to go, so it ponds around the stand and works into every weak seam. The roofing standard for low-slope roofs is no standing water 48 hours after a rain, and equipment runoff is one of the usual reasons a roof misses it.
Many coolers run a bleed-off line that drains a small, steady stream of water to keep minerals from building up. Where that line empties matters. Phoenix Manufacturing’s own manual warns against draining water onto a roof because of mineral buildup and roof damage. If yours dumps onto the shingles instead of into a gutter or drain, it’s watering one spot of your roof for five months a year.
The line that feeds the cooler often runs across the roof, and it’s the part most likely to freeze. A split line can sit unnoticed all winter and then run water across the roof or into the attic. As one Grand Junction service manager told The Daily Sentinel, it can end up as water coming through the living room ceiling.
Not every stain under a cooler means the roof has failed. Sometimes it’s the cooler itself, a cracked pan or a stuck float, and fixing the cooler fixes the leak. When we inspect, we tell you which one you’ve got before anyone talks about roofing.
You don’t need to climb anything to catch most cooler-related leaks early. Look for:
Any of these is worth a look before winter, when a small leak has months of snow and freeze-thaw cycles to grow. (Here are more signs your roof needs repair.) If water is actively coming into the house, that’s an emergency repair call, not a spring project.
Fannie Mae’s useful-life tables put an evaporative cooler at about 15 years. If yours is getting there, has a pan that’s rusting through, or barely runs since you added central air, fall is a good time to decide whether it stays.
If you’ve already switched to central air or a mini-split and the old cooler is still up there, it’s all risk and no benefit: a heavy unit, a hole in the deck and lines that can still leak. Removing it properly means taking out the unit and the duct, framing in the opening, and decking and roofing over it. A sheet of tin screwed over the hole is not a repair.
If you’re replacing the roof and keeping the cooler, the cooler has to come off its stand or be lifted so the roof underneath gets replaced and the curb gets new flashing. Shingling around a cooler that never moves leaves the oldest, most-worn part of the roof right under the heaviest thing on it. Plan it with your HVAC tech, so the cooler is disconnected before the roofing crew arrives and reconnected after.
A simple way to split it:
A little water around the cabinet while it’s running can be normal, depending on the unit. Water draining onto the roof, dripping from the register, or showing up anywhere after the cooler is shut down is not normal. Cooler manufacturers trace water on the roof to the float or the overflow, so start there, then check the pan.
We’d skip it. Plastic tends to trap moisture against the cabinet, and once a tarp loosens in the wind it slaps against the roof all winter. A breathable cover made for evaporative coolers costs little and lasts for years.
Yes. Closing the valve stops new water, but the line between the valve and the cooler is still full. That’s the water that freezes and splits the line, which is why manufacturers say to drain it and leave it disconnected.
About 15 years, by Fannie Mae’s useful-life tables, though a pan that rusts through can end it sooner. Manufacturers’ pan warranties run several years for that reason.
Once the overnight freezes are behind you. Grand Junction cooler pros generally suggest mid-April to mid-May. That’s also the time for new pads if you didn’t replace them in fall, a pan check, and a look at the roof around the unit before it runs every day for five months.
Power off at the breaker, water off, line drained and disconnected, pan emptied, vent closed, breathable cover on. Then look at the roof around the cooler, or have us do it. A cooler that’s put away right comes back in spring ready to work, and the roof under it stays a roof.
The inspection is free, and we photograph everything we find.